Today, I'm breaking down all 11 base weapon forges in Heroes vs. Hordes. I'll guide you through my decisions for choosing the left or right side of each forge, considering both the game mode and the specific weapon.
The key to mastering the forge is understanding your current game mode. Your choices for each weapon will subtly change based on this. I'll provide a mental model to help you make your own informed decisions for any weapon as you progress. Part of the fun of HVH isn't just being told what to do, but figuring out the optimal strategies yourself.
I've organized this guide into sections, so if you're looking for a specific weapon, feel free to skip ahead to that section.
Base Weapon Table of Contents

Base Weapon Forge Video Guide

Base Weapon Forge Strategy
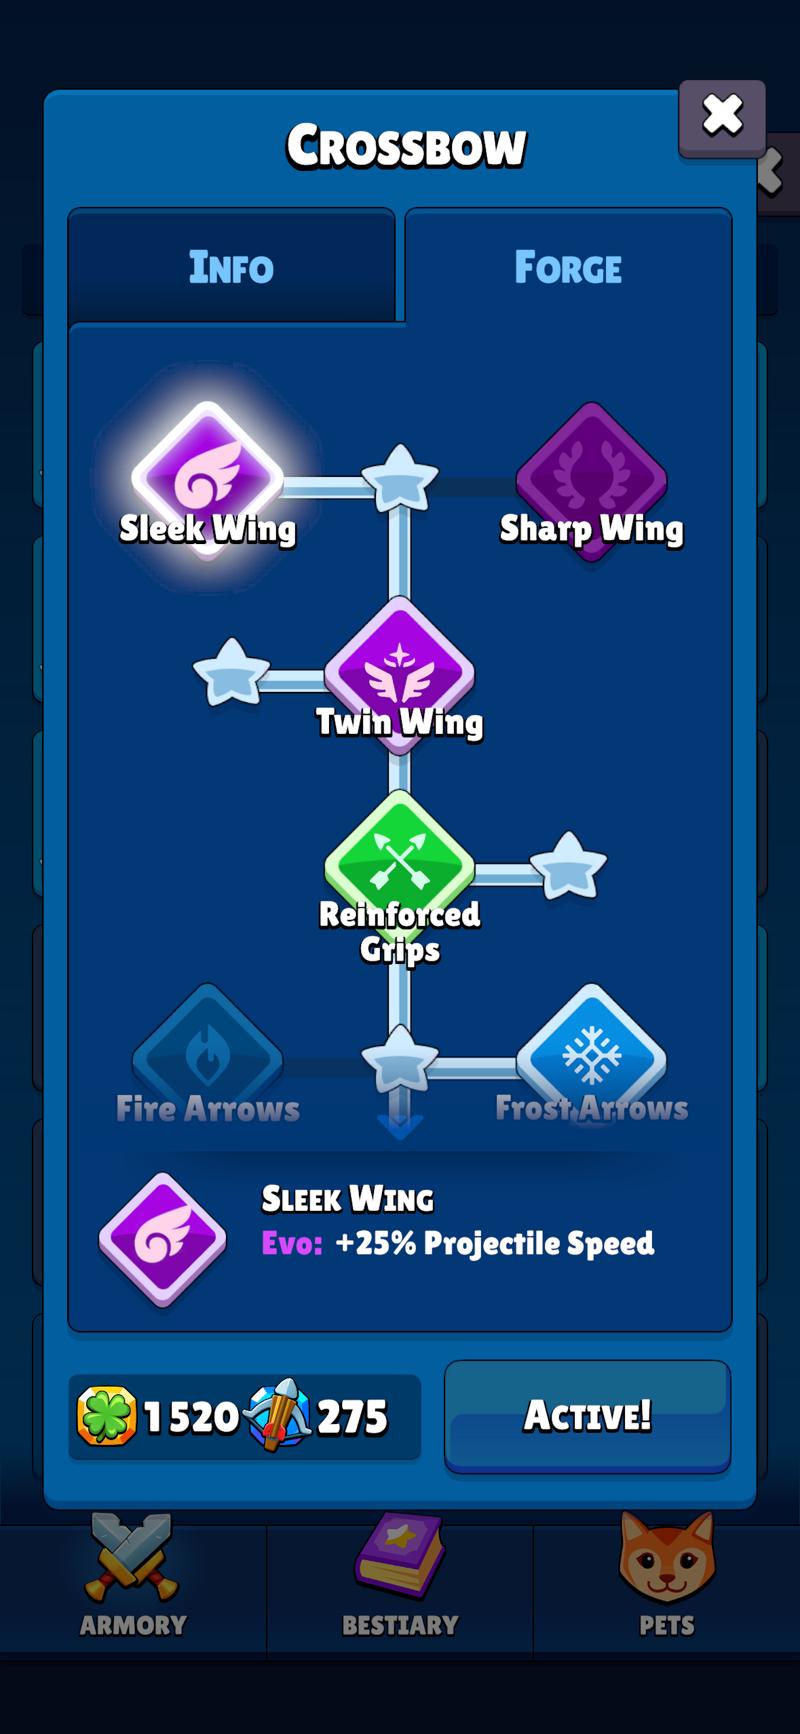
Crossbow
Level 1: You have a choice between Fast Shots (projectile speed) or Long Shots (effect duration). In my opinion, both are equally viable. Projectile speed makes the crossbow bolts travel faster, while effect duration keeps them on the battlefield longer. Choose whichever you prefer.
Level 2: You can pick Fire Arrows or Frost Arrows. Fire Arrows apply a burn, and Frost Arrows apply a freeze, which makes sense given their names.
I use Frost Arrows for game modes where freezing horde is crucial, such as Nightmare Mode, Hard Mode Arena, or any situation where you need to keep enemies at bay for an extended period. It's a great "one-point wonder" to throw into your build.
Fire Arrows are for applying burn damage. So, think of it this way: Fire Arrows offer more damage, while Frost Arrows provide more survivability.
Level 5: You're choosing between Projectile Speed or Straight Damage. Projectile speed is better for modes where you need to hit many hordes more frequently. Straight damage, often referred to as "Sharp Wing," is better when you're focusing on hitting fewer hordes more often. Most of the time, I default to Sleek Wing (projectile speed).
Fire Orbs
Fire Orbs are a cornerstone of most early-game builds. I still use them frequently in the late game since I haven't acquired many special weapons yet. They're one of my primary damage dealers.
Level 1: I always prioritize Area of Effect. My focus here is on the evolution, Flame Wheel. A simple rule of thumb is that Flame Wheel only benefits from Area of Effect, so we're always looking for more of it.
Level 2: You can choose between a Chance of Burn or More Area of Effect. I typically get burn application from other parts of my build, so I focus on maximizing damage from Fire Orbs and Flame Wheel. Thus, More Area of Effect is my choice here.
Level 4: Pyrosphere creates an inner ring, dealing 100% more damage. This is a significant upgrade. I've coined the term "damage over replacement" for situations like this. If a weapon is dealing damage when hordes are close to you, that damage is incredibly valuable. For Flame Wheel, any damage it deals when enemies are near is massively important, as it means it's stopping them from reaching you.
Level 5: I go for Blaze in every situation.Always right, right, right!
Bomb
Bomb is another weapon I've used since the beginning. Many players eventually replace it with items like Cow Whistle or other superior special items, but I haven't.
Level 1: Projectiles for Bomb isn't a bad choice; it increases damage and benefits its evolution, the X-42 Rocket. However, I believe Area of Effect hits more hordes more often. Honestly, I'm not entirely sure here, and I think you could go either way.
Level 2: Stun Bomb gives you a chance to stun, while Mega Burst offers more Area of Effect. Stun Bomb is excellent in modes where stunning hordes is crucial, like Nightmare Mode or Hard Mode Arena. It's incredibly helpful. Mega Burst, on the other hand, is better for Hard Mode, Normal Mode, or any mode where you have to clear out large groups of enemies quickly. You could even consider running Mega Burst in every mode; there's no bad choice here.
Level 4: I get most of my burning application from Bombs. This adds burning to the rockets, essentially setting the entire battlefield ablaze and applying burning to every horde, giving you a significant damage boost. Evolving Bomb is a huge asset in most builds for its burning effect once you have a four-star forge. And you get amplified burning damage from your talents.
Level 5: Quick Reload provides 5% cooldown, which is helpful early in the game before you hit the 60% cooldown cap. However, it becomes useless later on. From what I understand, for some weapons, this 5% additional cooldown makes a difference, but I don't believe it helps for Bomb. Therefore, I opt for Mass Destruction, which provides more Area of Effect.
Divine Aura
Divine Aura is an interesting one. You can't evolve it in most late-game modes, but it's incredibly helpful early on for its healing, especially in a Flag Pole build for the Knight.
Level 1: You can choose between Pushback or Area of Effect. I think this is a bit of a wash. I use Pushback for Nightmare Mode and other scenarios where I just need a single point in it and then forget about it. If you're actively trying to maximize healing and a bit more damage, then you'd go for Heavenly Horizon (more Area of Effect).
Level 2: You can either go for a Stun or a Chance to Burn. We see a lot of chances to burn in base weapon forges. I personally go for Stun Radiance in Nightmare Mode and Hard Mode Arena because the stuns are essential there
I keep repeating this, so hopefully, you're getting the idea of when and why to pick a stun.
Level 4: Adds a slow effect.
Level 5: Plus Regeneration is nice, as is Minus 5% Cooldown. I would use the 5% cooldown early in the game and then switch to Blood Moon (Regeneration) later on.
Boomerang
Boomerang is great! They were actually one of my favorite weapons for the Hero Hoang evolution. (I call it "Hero Wang". I like that better personally.)
Level 1: For the forge, you have a couple of damage options. +2 Projectiles or +5% Critical Hit Chance. I go for +2 Projectiles as it generally provides a higher damage amplification.
Level 2: You can choose Stun, which has a super high 20% chance to stun. I frequently use this as a one-point wonder in Nightmare Mode and Hard Mode Arena. That stun is incredibly valuable in Nightmare Mode; it can truly make or break a run. I also really like it in Faction Wars, so keep that in mind.
Level 4: The four-star forge adds Burning. Again, another opportunity to add burning to your build.
Level 5: You can get either go Pushback or Massive Destruction (+4 Projectiles). That's actually a significant damage amplifier. Each projectile beyond a certain cap simply adds damage to the existing ones. In this case, with +4, you're likely near that cap, so each new projectile will contribute a percentage more damage. This could result in a 15-20% damage increase for Boomerangs.
Arcane Staff
Arcane Staff is secretly overpowered in the late game once you have the four-star forge. Before that, it's pretty "ho-hum," and building duration feels bad. But later in the game, I use this thing constantly. Unfortunately, I use it so much that it ends up in all my videos, ruining the aesthetic with purple laser beams coming out of my heroes.
But it's so valuable that I keep using it.
Level 1: You're looking for Effect Duration or More Damage. I go for More Damage. Effect Duration is better for the unevolved version because it will stay on the horde longer. The increase to damage is for Death Ray, because once Death Ray locks on, it doesn't leave, so you don't need Effect Duration.
Level 2: There's a Chance for Burning or More Projectiles. This burning is actually how I apply burning in Boss Brawl. I use Additional Flares (more projectiles) in Nightmare Mode to hit and slow more hordes.
Level 4: You get a 90% slow while Death Ray is active, and once Death Ray is on, it doesn't leave. This is super, super valuable again in late-game Nightmare Mode and Hard Mode Arena. It's also really strong in Dragon's Tower, actually. That's the other big one: Dragon's Tower and Nightmare Mode.
Level 5: You get either increased Breath Burning Damage or Minus Cooldown. I always increase the damage from burning. If you're early in the game, you could consider cooldown if you need it.
Ice Wand
Ice Wand is one of my favorite weapons. I use it constantly, perhaps overusing it compared to other players, but I find it incredibly valuable. It attacks the closest horde to you and freezes them.
If it's freezing something, it means that the enemy was about to hit you. This goes back to the concept of "damage above replacement". In this case, "disruption above replacement." Anything that gets hit was close, and so it's good that it's hitting it. You also get an amplification to frozen hordes via your Wizard Ring, so freezing hordes actually deals more damage.
Overall, I think this is a very good weapon.
Level 1: You have More Projectiles or More Cooldown. The same concept applies: projectiles later in the game, cooldown earlier until you hit the cap.
Level 2: You choose between More Projectiles or Enduring Chill. This one is interesting, as you can start making decisions here and combine it with the very last option…
Level 5: Ice Barrage, which is More Projectiles or More Status Effect Duration. Status Effect Duration determines how long hordes stay frozen.
If you're hitting fewer hordes, like in Hard Mode Arena, I would actually go with a Status Effect Duration increase for both of these. Because hordes are so clumped together there, you can rely on the evolved Frost Nova to freeze them, and this will keep them frozen longer, giving you more time to deal damage.
However, in something like Nightmare Mode, you might want to strike a balance, perhaps increasing duration with one and the number of projectiles with the other, or simply more projectiles to produce more freezes. This combines nicely with Piercing Ice, which adds one penetration to the weapon, meaning it goes through one horde and hits another.
So, if you increase the number of projectiles and increase the penetration, you're essentially getting double the value from each of those. You're trying to strike a balance there.
I typically go with something like Left, Right, Left for most game modes to get more status effect duration plus more projectiles, which are then doubled by Piercing Ice.
Hammer
Hammer is one weapon I never use. It was the first one I removed from my rotation as soon as I acquired a special weapon. It actually negatively impacts you in guild events, making it one of the few weapons to avoid in an event course.
Level 1: You get either an Increase to Damage or a Reduction in Cooldown. You definitely want an Increase to Damage here.
Level 2: Hammer Time offers bigger hammers or more projectiles. I personally go for More Projectiles here.
Level 3: Devastating Force (Level 3) is nice. The 1.025 damage multiplier is significant, making this a really good three-star forge.
Level 4: At Level 4, you get More Pushback.
Level 5: You can choose between Cooldown or a 7% Chance to Stun an Enemy for two seconds. These are all quite bad. This entire forge is just a mess, so you shouldn't be using Hammers if you can avoid it.
Again, early in the game, cooldown helps. Later in the game, you want stuns and more damage. And again, I go for More Projectiles over bigger projectiles.
Chain Lightning
Chain Lightning is core in most builds.
Level 1: Choose between Projectile Speed or Projectile Count. It scales off of projectiles, so get More Projectiles here.
Level 2: You can either go for a Chance for Burn or More Damage. If this is your first opportunity to get burning, grab that. Otherwise, just go for More Damage.
Level 5: Shocker. When you evolve Chain Lightning into Thunderbolt, it deals area damage as it hits hordes. Shocker removes that area of effect, but each horde hit deals four times more damage. So, in an area where you're hitting fewer hordes, you might consider this, although I think Electric Shock is better, as it increases the area of effect even more.
Most of the time, I go Right, Right, Left here, aiming for as much damage as you can get out of Chain Lightning to as many hordes as possible.
Dragon's Breath
Dragon's Breath is fantastic early in the game, but it falls off in the mid-game, where you can stop using it completely. However, up until then, it's actually your best weapon. So, it's super valuable early on.
Level 1: You can go either way: More Damage or More Area of Effect, depending on where your talents are early in the game. If you're lucky and have a bunch of Area of Effect talents, then consider Hot Wind; if not, consider Area of Effect.
Level 2: There's another Chance for Burning or Effect Duration. Early in the game, Effect Duration can help because it will go off cooldown quickly in early runs, so that's not a bad choice. If this is your first place to get burning, grab that; burning will give you a big damage amplification.
Level 5: It's either Status Effect Duration or Effect Duration. Both of these are not great, so overall, the Dragon's Breath forge isn't super valuable. Honestly, by the time you max out this forge, you're likely not using it anymore.
Poison Darts
I've had a change of heart regarding Poison Darts. The issue is that they aren't very good at the beginning of the game because they only shoot in two directions Furthermore, they don't synergize well with your other weapons.
Later in the game, when your talents are higher and you have a poison multiplier in your talents (that's a 1.3x), then Poison Darts are actually one of the better weapons you can get just to apply poison, because that multiplier effect is pretty big.
It's like getting a damage tome, which provides a nice amp across other weapons, removing it's early game weakness.
You do have some interesting choices with Poison Darts forge.
Level 1: You can either do Rear Damage, which has them all attack from the back, or Front Damage, which has them all shoot forward. If you're using an Auto-Aim hero, you could consider Front Damage, and if you're using something like a Tinker where they're always behind you, you could consider Rear Damage.
I personally don't like either of those. I'm never going to "troll" my hero well enough to optimize for Poison Dart damage. So, I ignore those and instead go for More Projectiles, More Damage, and Big Darts to hit more targets and deal more damage.
Level 5: Improved Formulas offers Status Effect Duration or More Projectiles. We're going More Projectiles here for more damage. You'll get them poisoned long enough that you don't need the Status Effect Duration of the poison to last longer. You just want to do more damage with the vials you're throwing.
Base Weapon Forge Summary
And that's it! That's all 11 base weapons in Heroes vs. Hordes. Hopefully, I've given you a mental model to understand when to choose between different forge options, and you can apply these to special weapons or to your unique situation.
Early in the game, cooldown is super valuable. Later in the game, for things like Nightmare Mode, you want stuns and slows and that kind of thing. So, you can choose levels in the forge as you see fit for any game mode.
The most important thing about forges is to actually read them and then think about how they apply to your game situation. Early in the game, cooldown will help you. Later in the game, status effects like burning, stuns, and slows will help you more. And it's good to know you can always change your mind and pick a different one.